Topics
IntroductionThe Stoves
Fuel
The Stand
The Windscreen
Cooking Pot
Tools
Safety
Cooking in Camp
Links/Websites
Equipment Manufacturers/Sellers

TopicsIntroductionThe Stoves Fuel The Stand The Windscreen Cooking Pot Tools Safety Cooking in Camp Links/Websites Equipment Manufacturers/Sellers |
|
These pages are for documenting the work I've done on alcohol stoves for use in backpacking. These are very popular on the Pacific Crest Trail, the John Muir Trail, the Appalachian Trail and other long distance or ultra light weight adventures.
Since I've done quite a few things while making these stoves, I know I won't remember them over time.... so I'll try to collect that information here and share it with the backpacking community.
What this isn't - It isn't a "how to" set of instructions...see the full web sites for that - this is just additions to the info found there and tidbits of experience.
It's important to note that these stoves need to be considered as part of a System . A standalone stove might work great or poorly by itself, but put a windscreen around it, or a pot over it, and the performance might change dramatically. Likewise, the height between the stove and the pot is critical, as is the amount of fuel used.
These alcohol stoves are designed for boil a couple of cups of water. That works fine for me, but if your cooking style differs from that, then these stoves might not work out for your trips.
Hopefully the pictures will help when it comes time to build more stoves or to rebuild one of these stoves. Since I've been backpacking for a while with these stoves, I've updated this web page.
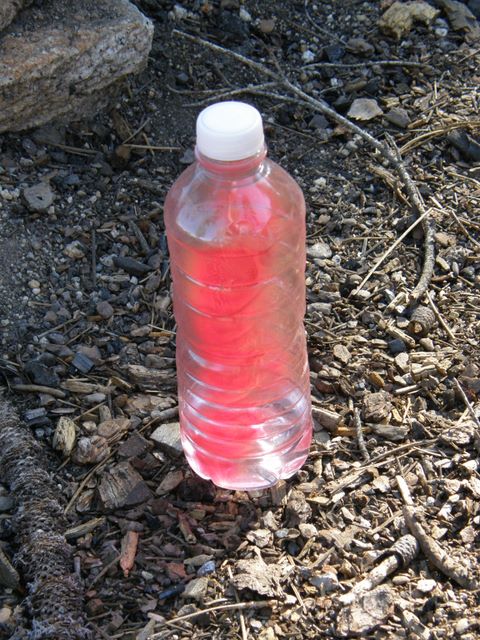
Note: This fuel bottle should have been painted red!
These are the stoves I made with some details about each one:
| Stove 1 - V8 Stove Stove 2 - Cat Stove Stove 3 - Pika Stove |
 |
Stove 4 - Hybrid Sideburner Stove Stove 5 - Pressurized Stove Stove 6 - Penny Stove Stove 7 - Penny Stove #2 |
All stoves were tested with 24 fl oz - two Backpacker insulated mugs worth, in a K-Mart Grease pot, with lid on, from 62 degrees to boiling.
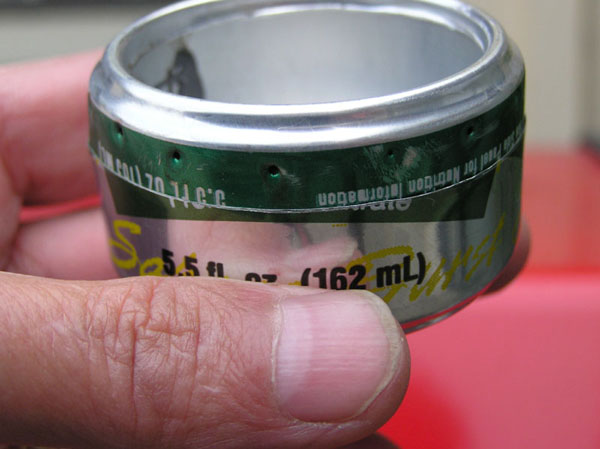
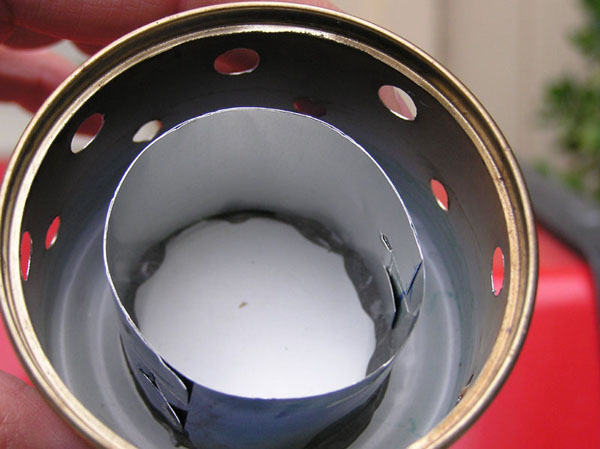
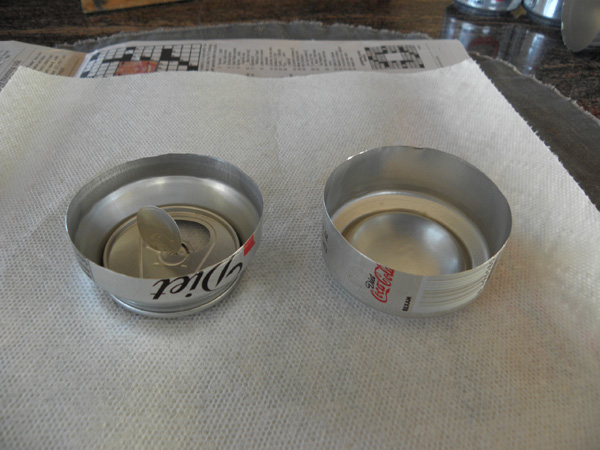
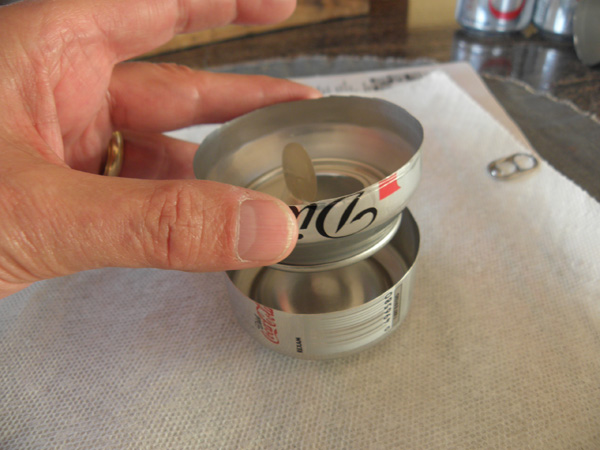
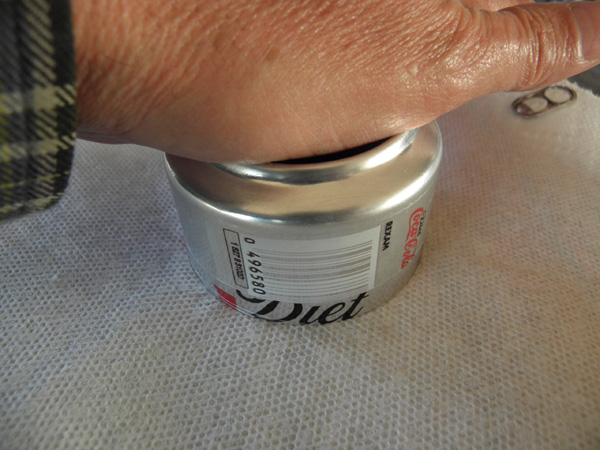
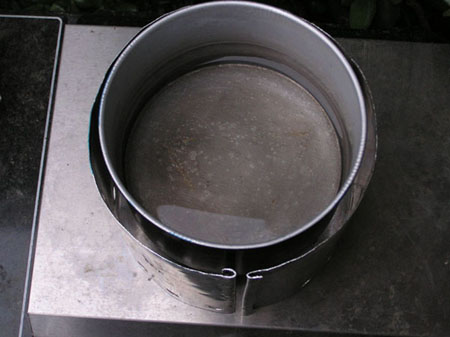
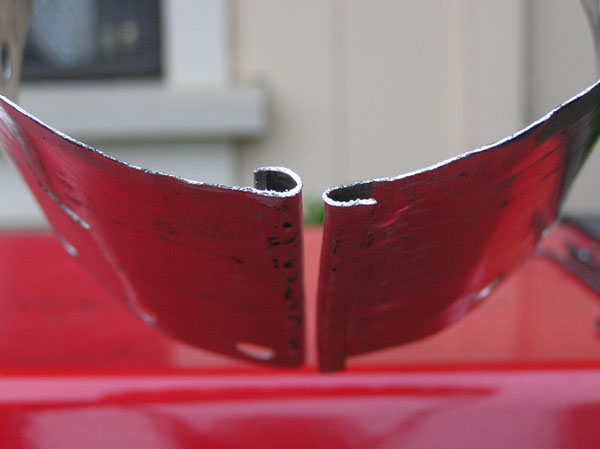
This stove is made with two 5.5 ounce juice cans. It is small, and lightweight. The cans are actually easier to work with than the larger soda cans when it comes to expanding them and fitting the two pieces together.
Construction tips - When I built this stove, which has an inner wall, I used the tab method to join the wall instead of epoxying it. - Use an Xacto knife to cut a slit in the wall, and bend a tab on the other side of the wall 90 degrees. Fit the tab into the slot, then bend it the rest of the way over. (NOTE: you will only get one chance at this - bend it a second time and the tab will break off.
I find it helpful to sand the inside edge of one can and the outside edge of the other can so they have a miniscule angle to slide together.
After cutting a hole in the center, scribing with an Xacto knife and breaking out the quarters, I used a but half-moon file to make the nice edge on the inside of the can.
I put a thin layer of fibreglass between the walls to help wick the fuel between the walls - they are close together and I think this helps that action also.
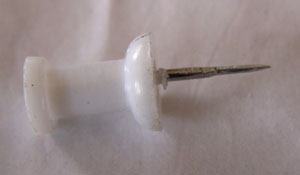
The 24 holes are very small - made with a sanded down (smaller) push pin.
This stove is 1.25 inches high by 2 inches wide, which I think helps the heat transfer to the fuel. The smaller diameter helps too. But that makes this stove not a great candidate for putting a pot directly on top of it. Whenever I did this, it went out. This small stove is sensitive to the cold pot, which just puts out the stove.
Use: Used tall stand (3 inches high), medium stand
 |
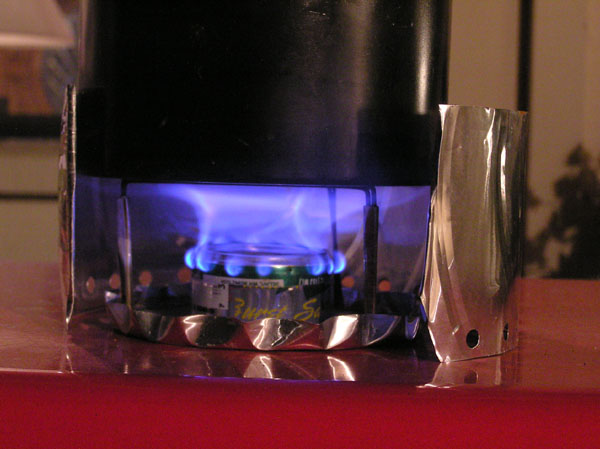
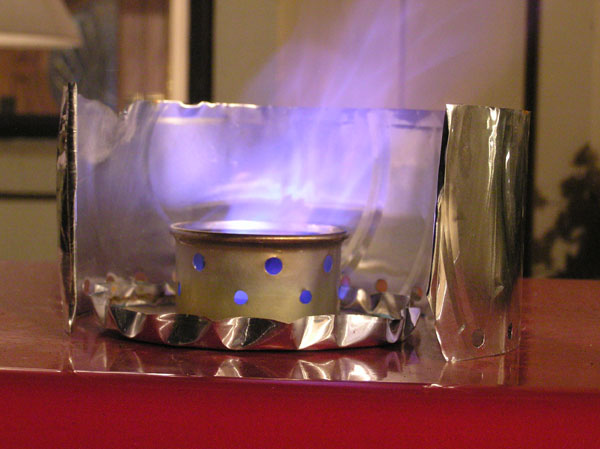
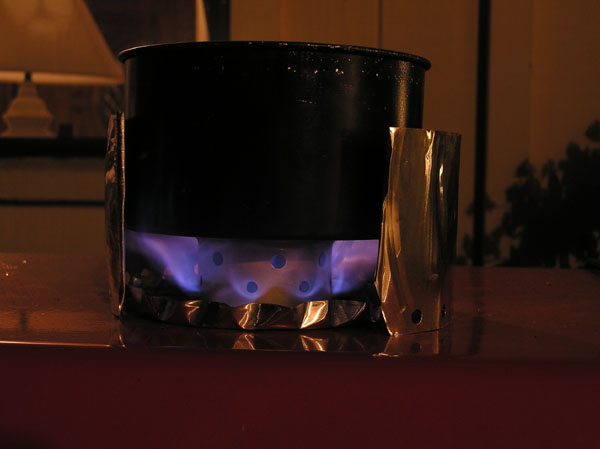
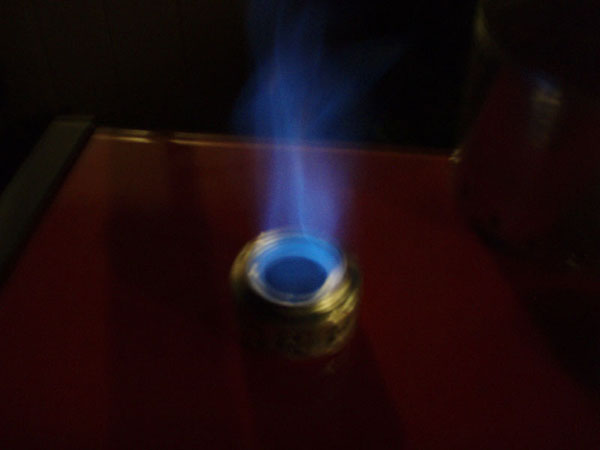
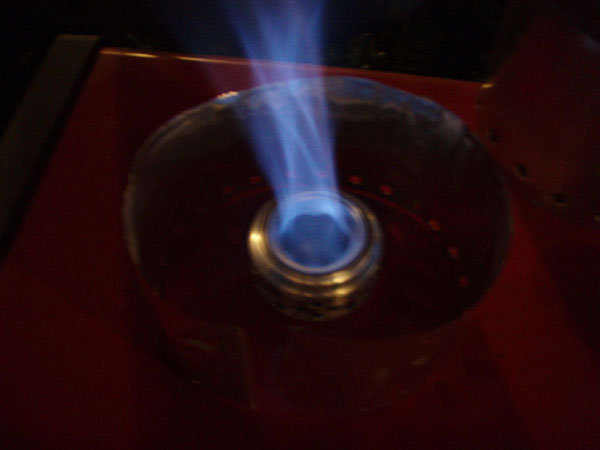
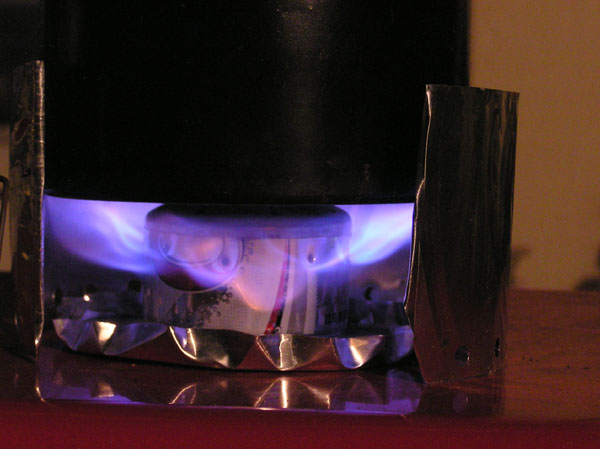
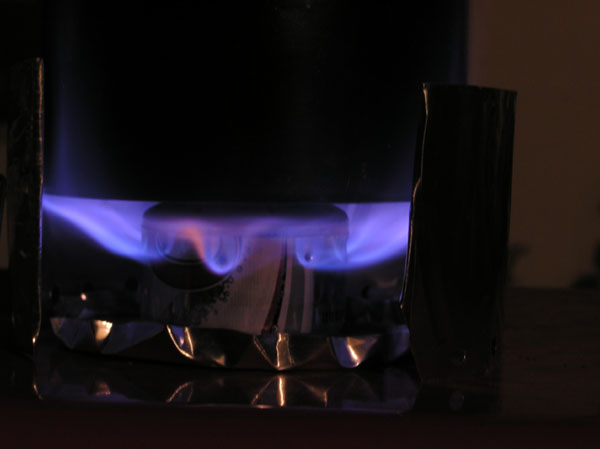
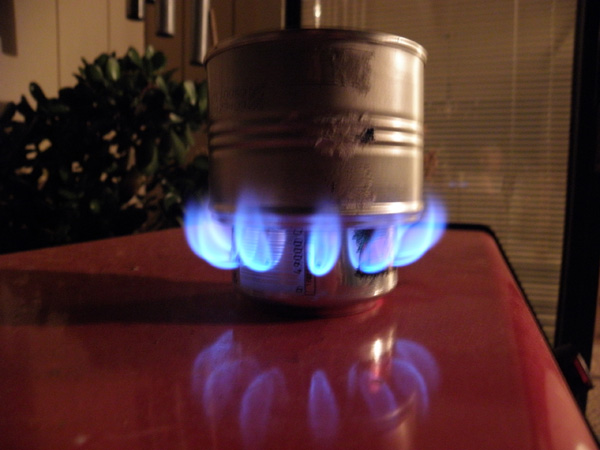
This picture is taken at night - you can see how hard it would be to see this tall flame in the daytime! Note how the flame is jetting out the sides even though the large center hole in the stove is not covered over (pressurized). This is due to the sides of the stove being heated, causing the fuel to vaporized between the two side walls. These two pictures have a pretty good view of the stand also. |
This stove is made from a small cat food can. The holes are made by slipping a hole punch over the rim. I reamed out the upper layer of holes to help it burn better. I found it needed the interior heat exchanger wall - otherwise when I put the pot on top, it gradually went out. You light this stove from the top, let it heat up for a bit, then put the pot directly on top - no stand necessary. It is fairly stable, but I'd hold the pot if you stir the food. This stove is not as efficient - it uses more fuel, On the other hand, it is very simple to make and use. |
 |
Update: I like taking this stove with me. I use it with a stand as I found a pot with water in it doesn't always balance so well on the gound in the wilderness. One time I caught the inner wall when packing it and it came loose. I've since reglued it and am using it again.
Use: On top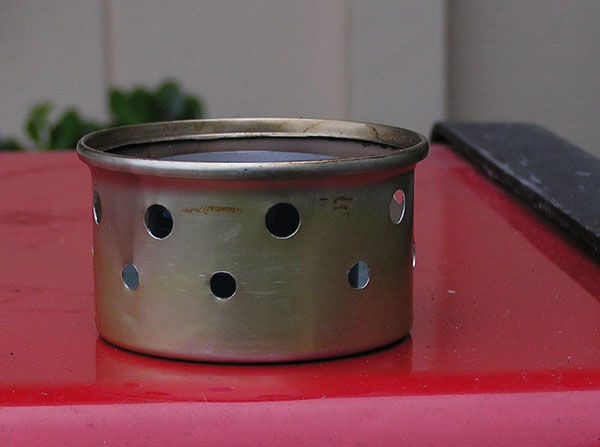
 |
The next two pictures have a good view of the bent over tabs. |
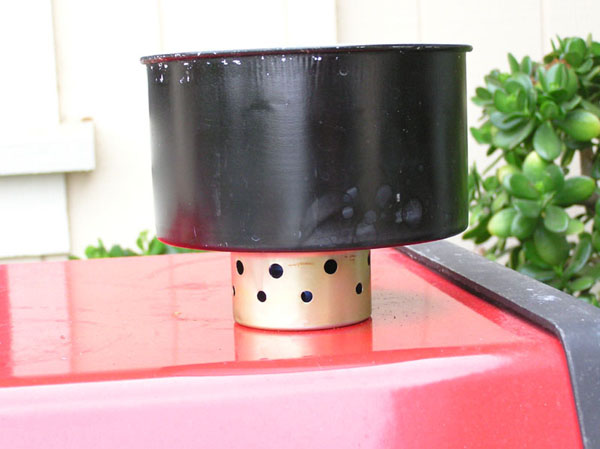
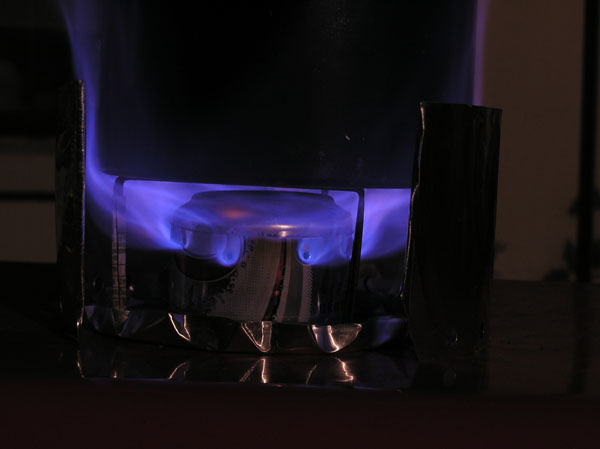
The first picture shows the heating up stage - no pot on top. Once the pot covers the open top, the flames come out the holes in the side and nicely spread out around the pot. This is actually a pretty stable setup with this size can. Notice the windscreen made from aluminum pie tins.
Center burning has an inner wall, flame goes up pretty high (8 inches).
The pot should be 1.5 to 2 inches above the stove center outlet. It is sensitive to the height, so use a taller stand. Once you put a pot over this stove, it seems to operate quite differently.
Splash a tiny bit of fuel on the side to light it. It is hard/dangerous to light it from the top.
It is very sensitive to the wind - you must use a windscreen for it to be effective.
The center hole was built by drilling a hole, then using Xacto knife to score around the edge of the marking made using a quarter. The 4 slits were cut with the Xacto knife, and the tabs were worked back and forth. After they broke off, a half moon file was used to even out the edges, then the hole was sanded.
You can set the pot on top of this stove after it has been heated. Make sure you wait till the fuel is bubbling.
The last picture of this stove shows it in use with a stand - it worked just fine that way.
Use: Pressurized by pot on top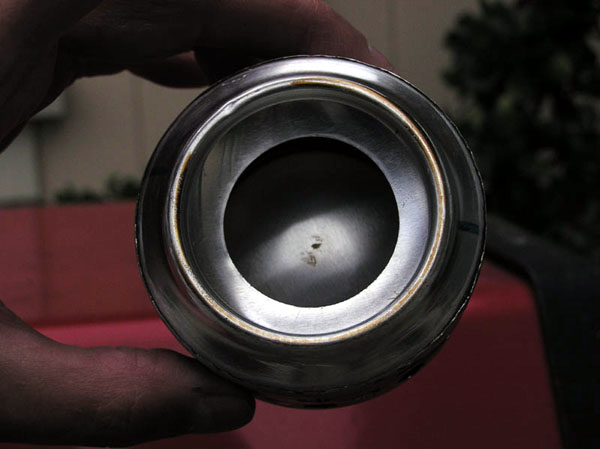
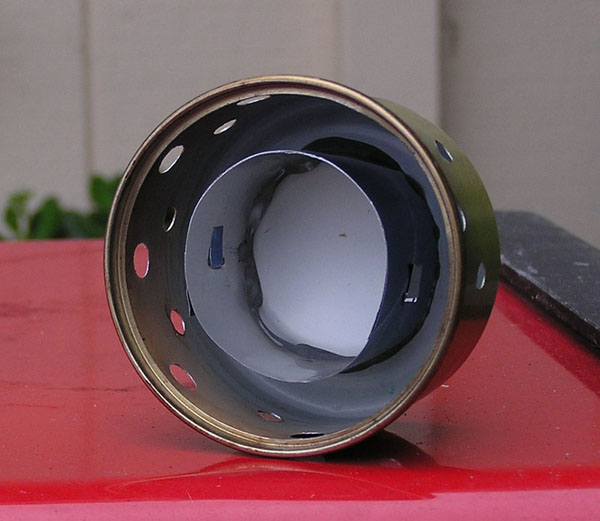
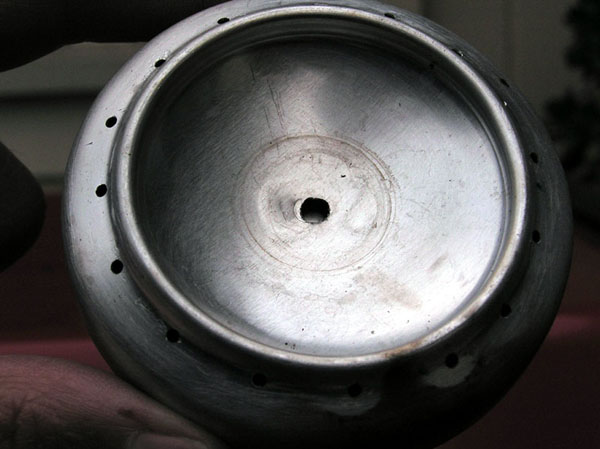
There are large holes in the inner wall (cut with multiple hole punches in 4 separate areas) that let the fuel in/out from the walled area. This is why the stove can work with a pot on top.
There are four holes in the top of the inner wall that let the fuel vapor move out so combustion can continue when a pot is on top.
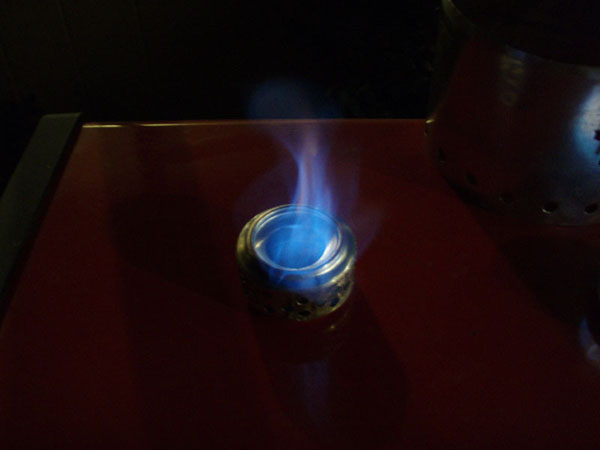
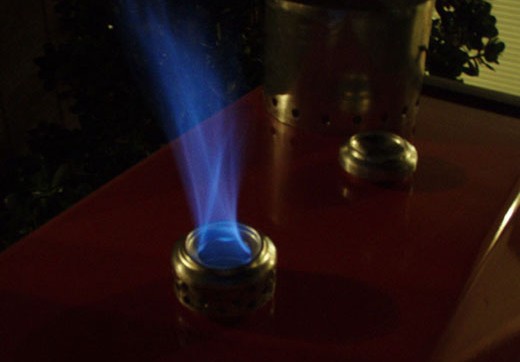
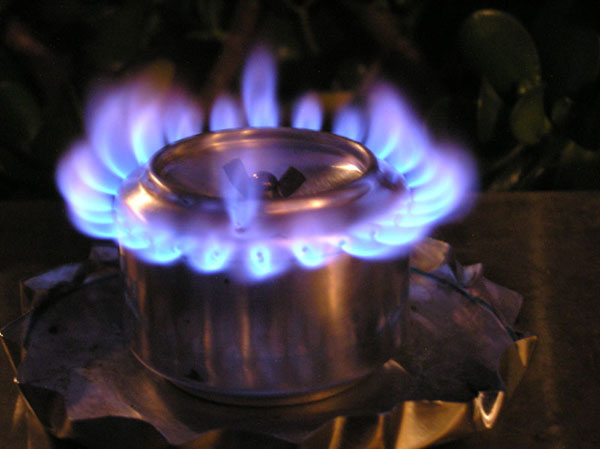
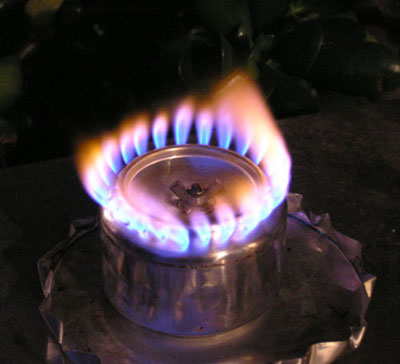
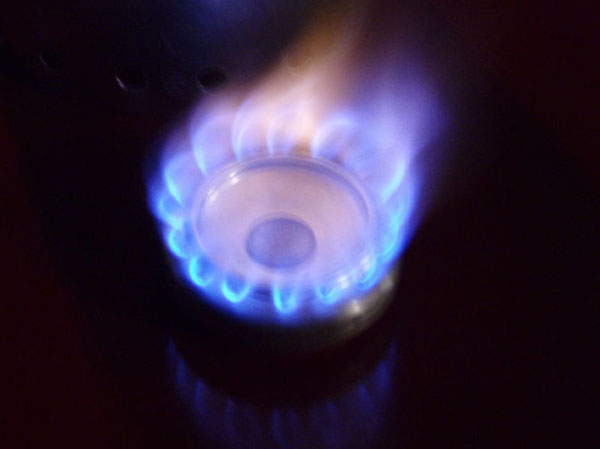
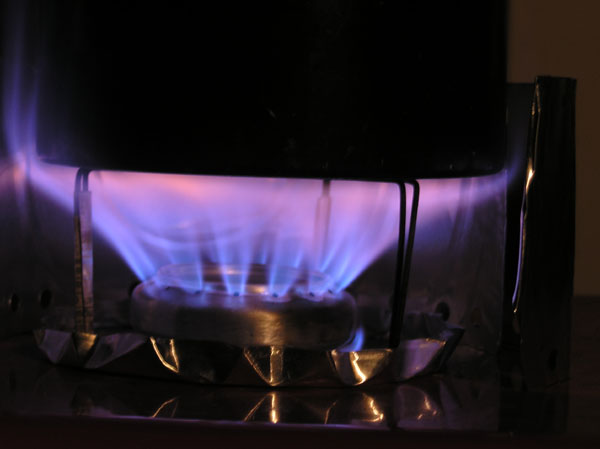
This is a good illustration of the danger of the flame from an alcohol stove. This picture, taken at night, shows the flame. But in the daytime you can just barely see this flame, even though it is quite high.
It is easy to get burned if you are not careful!!!

Dinnertime!!!!

Pressurized by putting the pot on top.
Note the large holes (1/16 inch drill). You can also make more, smaller holes for this type of stove. The holes on the side are further down on the can than other types of stoves. It can hold quite a bit of fuel.
A soda can stove is fairly stable with a pot on top....but I'd hold the pot if I was going to stir the food.
A tip for the soda can joining - you need to work the bottom/larger section to get the two cans to fit together. Forcing the cans does not work well - but firm pressure is needed to push them all the way together. Keep working the cans (forcing the bottom section over a full/unopened soda can) until you can get them to slide into each other. Sanding the edges to make a slight angle helps. Make sure there are no burrs or uneven sections.
I played with heating the top and cooling the bottom, thinking that might expand the top and contract the bottom, but it didn't seem to help much. The thin aluminum changes temperature too fast to make this technique effective...but you can try it!
Balance - for this stove you need to heat the walls enough to vaporize the fuel. Big holes - not enough wall heating. But you need air (oxygen) for the combustion.
I drilled these holes after I put the stove parts together.
Use: Pressurized by pot on top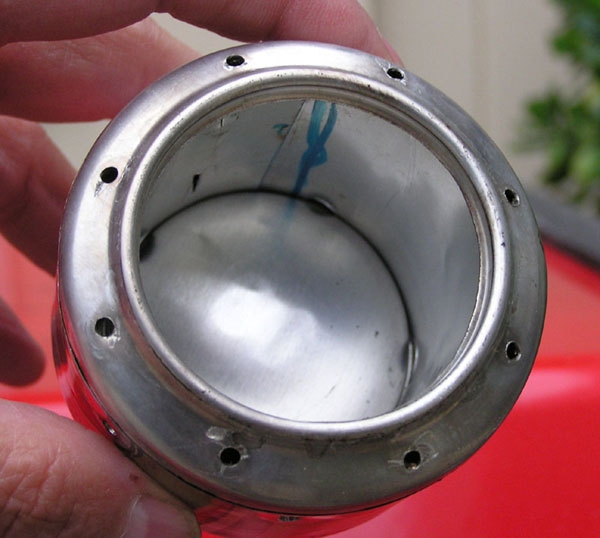
Note the seam and the markings I used to help with cutting the length.
I cleaned these holes up a bit later after trying the stove out. A small round file from my hobby tools helped.
The picture below is is what happens when you don't quite get the parts together correctly!
I crushed one of my stoves trying to fix a problem like this...just a tiny bit too much pressure.... Once the sides of the cans crumple, you might as well start over with fresh cans.

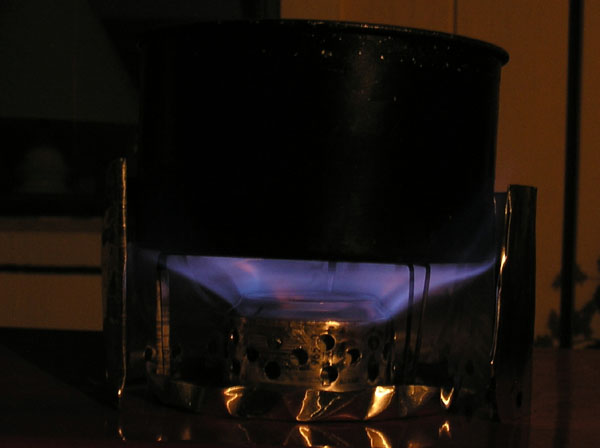
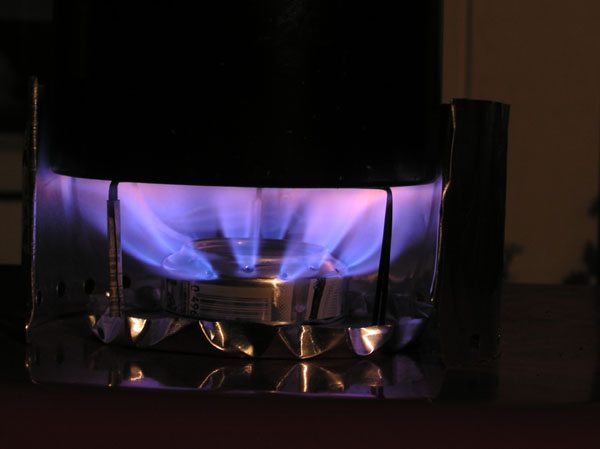
The same stove but on the stand - not quite pressurized, but it seemed to work well this way also. Note this stove is kinda high, so there is not much space between the top of the stove and the pot.
See how the flames are going all the way up along the sides of the pot!
This windscreen is made out of aluminum pie tins - it is light weight but won't stand up to much very high heat or direct flames. But it is easy to make a new one, and the price is right! Not to mention you have to eat a pie first...
Yum! Yum!!!
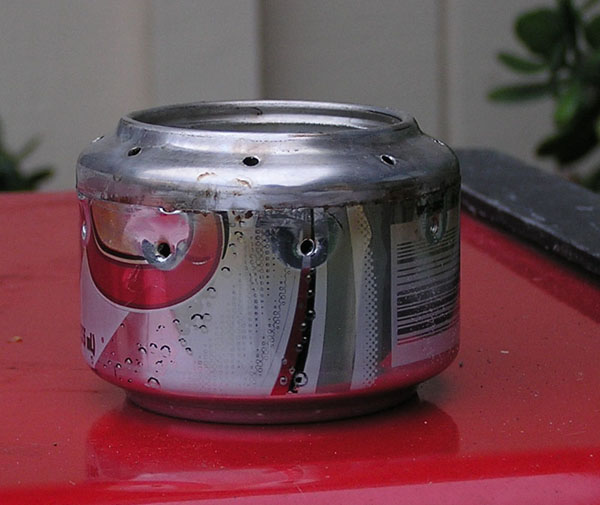
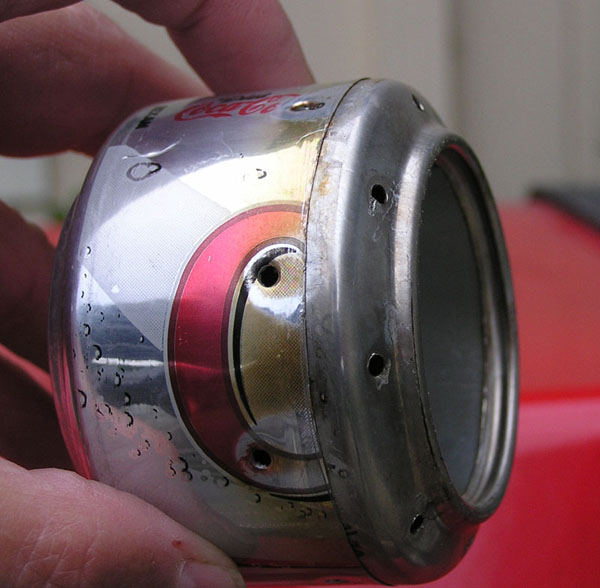
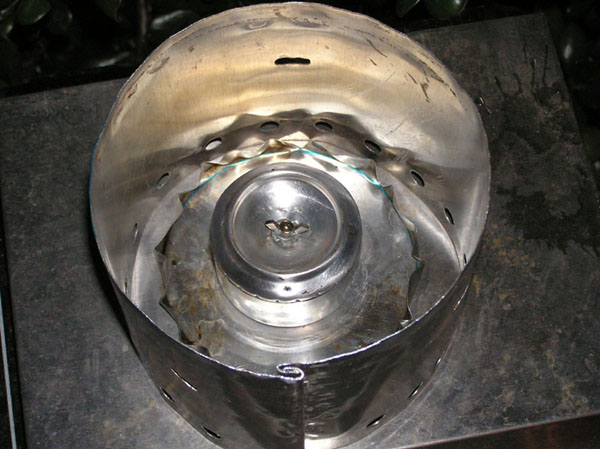
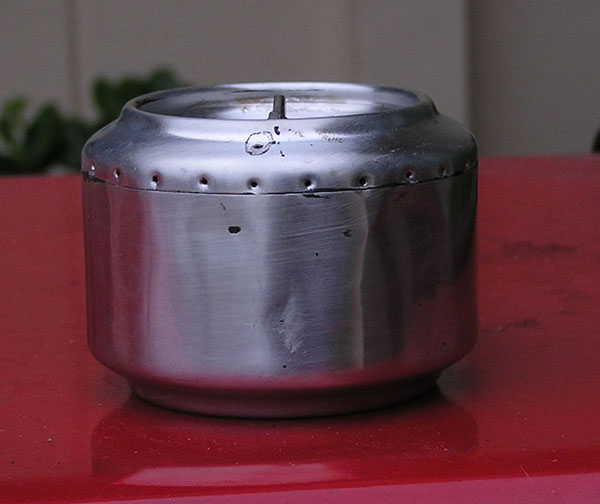
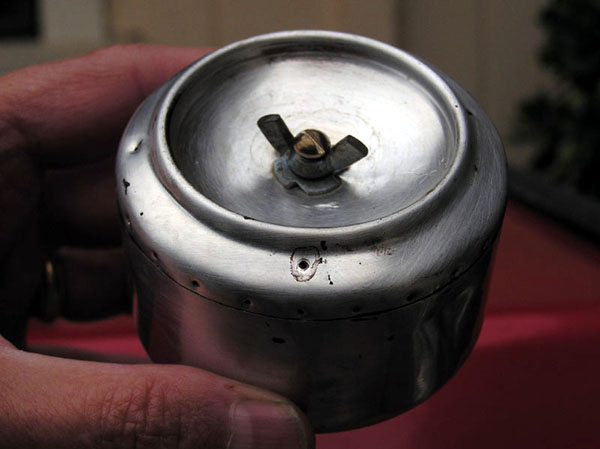
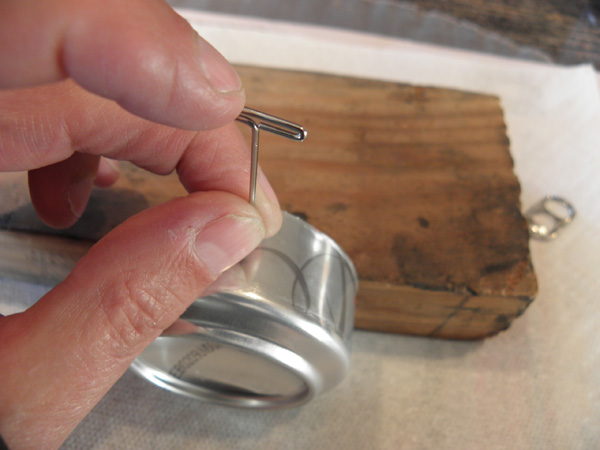
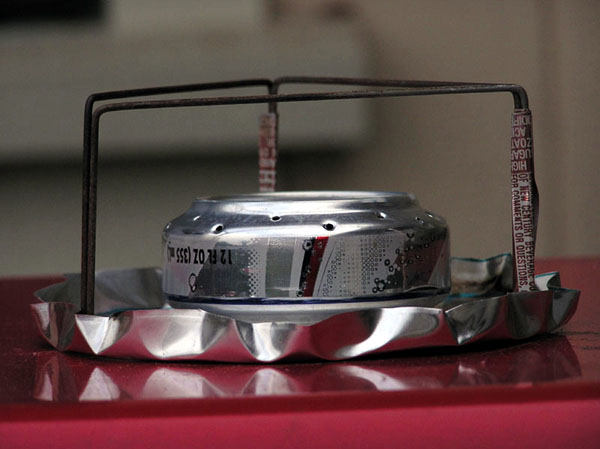
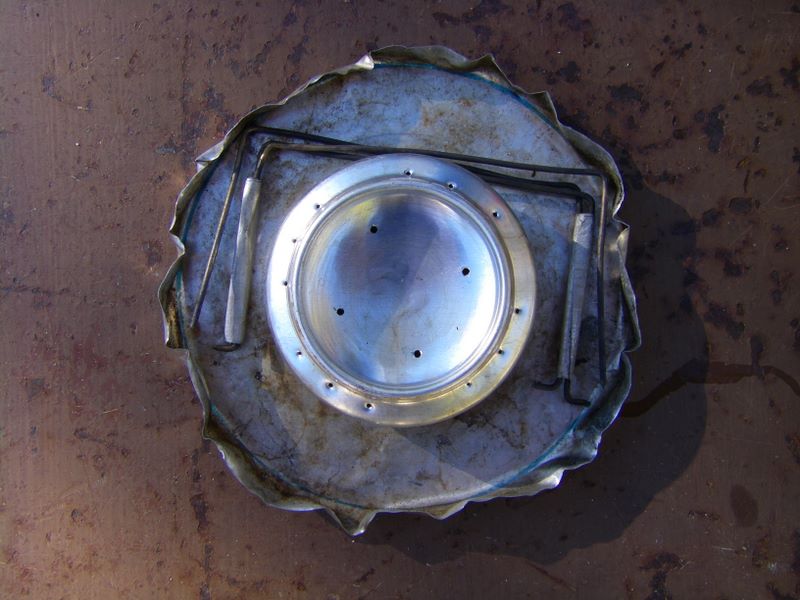
There are two stoves pictured here - one has holes around the top, the other has holes on the side. They both function almost identically. This stove is pressurized by using a tnut to seal the stove. The alcohol is vaporized and flames jet out from the small holes. Note that the hole size is important for this stove.
Tnut - I drilled a starter hole in the center of the stove top, reamed it out with a round file, then tapped the tnut into place with a hammer, using a socket (from a socket wrench set) to provide backing for the can top. Then I bent over the tnut prongs that poked thru the can and epoxied it into place.
Heating the sides of the stove is more important than the top - splash alcohol on the sides and base to get the side wall heated quickly. Once the flames are coming out of the holes put the pot on the stand. Use with a stand putting the pot about one inch above the stove.
I should have made these stoves not as high - I think they would have worked better then.
Has an inner wall to conduct the heat to the fuel.
On this stove, I put 4 holes in the top rim to try to heat the center of the pot. I should have angled these inward.
The 24 holes in this pot are very small - made with a pushpin.
Use: Pressurized with Tnet and screw.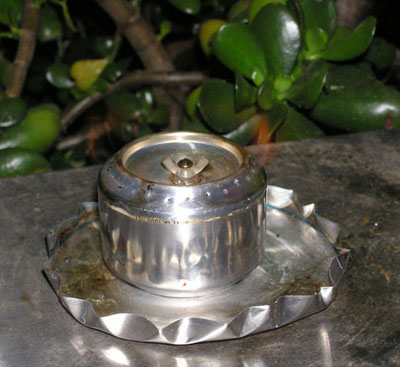
 |
Note the windscreen construction in this picture. This is a heavy duty (and relatively heavy in weight) windscreen made of roof flashing material. It's sturdy, but you pay a weight penalty. |
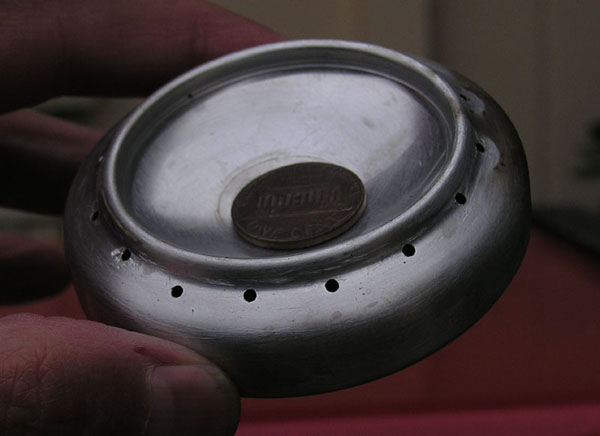
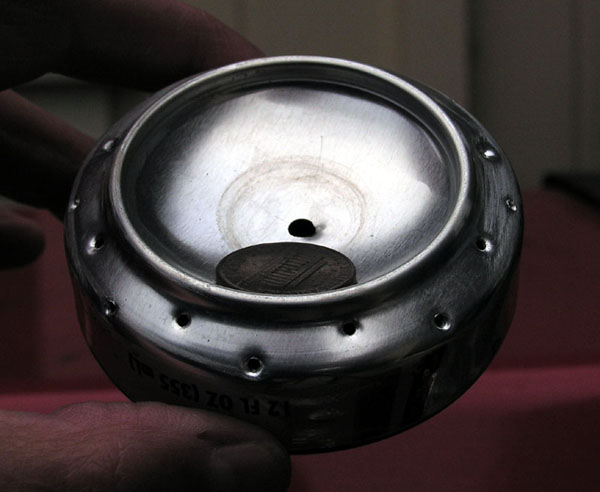
The penny is the seal for this 1 inch high stove - make sure the top of the can and the chosen penny don't have gaps. Not all pennies are flat enough. A rock will work too, if you are feeling lucky.
It seemed to be easier to fit the two parts of this not-very-tall stove together. The bottom part got expanded easier, though this also might just have been the two cans I was using.
The next stove (#7) is the same, but slightly taller and with bigger holes (1/16 inch). These stoves do not have inner walls.
Update: This is my main stove now. It's light, easy to use, pretty much foolproof. It packs easily and has proven to be pretty sturdy. It doesn't hold too much fuel, but plenty for boiling my two cups of water.
I should try to make a pot stand that is not very high for this stove - it would probably work even better then.
Use: Pressurized with a penny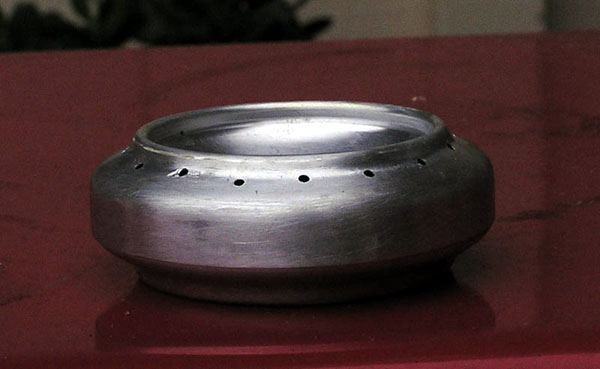
For esthetic reasons only, I sanded off all the can markings to get a shiny aluminum finish. You can also paint these stoves with a high temperature paint.
So far my experience with paint hasn't been so hot (pun intended). Maybe I just haven't let the high temperature paint from an auto store dry long enough.
 |
Oooohhh, what nice jets we have here! |
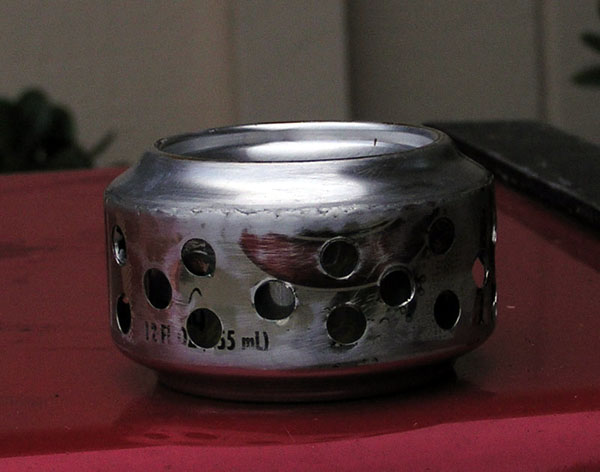
This stove has a different hole pattern, with larger holes, some angled to the sides. The holes were punched in with an awl from my Xacto set. It is taller stove, 1.25 inches high. It can hold quite a bit of fuel.
Use: Pressurized with a penny, use medium stand.
 |
I angled the jets inward more on this penny stove to try to heat the middle of the pot - it seems to be effective. |

These penny stoves are little but they sure put out a large amount of heat! Their small size helps heat up the aluminum and vaporizes the fuel faster I think.
They are very simple, yet effective.
After having built and used a number of alcohol stoves, I thought of a simple to construct stove. It even seems to work fairly well!
You take the bottom of a soda can and the top of a soda can, cut them off about 1 inch high, and then push fit them together. This way you avoid having to expand one half, which always takes me time and is a bit difficult to do well.
Since the top and the bottom of the can are designed slightly differently, when joined there is a space in which the alcohol can vaporize. You just flip the top over and push fit it into the bottom of the can. Then punch a row of holes around the can into this space.
Pour the fuel into the can via the open pop top, let it heat up until the jets start up, put the pot on top of the stove, and you are good to go. You don't even need a stand!
It takes me about ten minutes max to build one of these stoves.
Here is the top of a soda can, with the soda drunk and the pop top open, about to be inserted into the bottom of the same soda can. Flip the top over, let the angled side guide it into the bottom section. Push it down gently until it is started.
Flip the can over so the sharp edge is facing down, push the can halves together gently.
I sand the top after this so the edges are a bit less sharp and to make the top very even - this is what the pot will sit on and you want the pot to seal this open chamber.

Punching the small holes with a push pin.
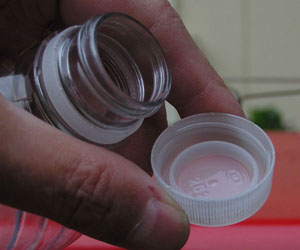
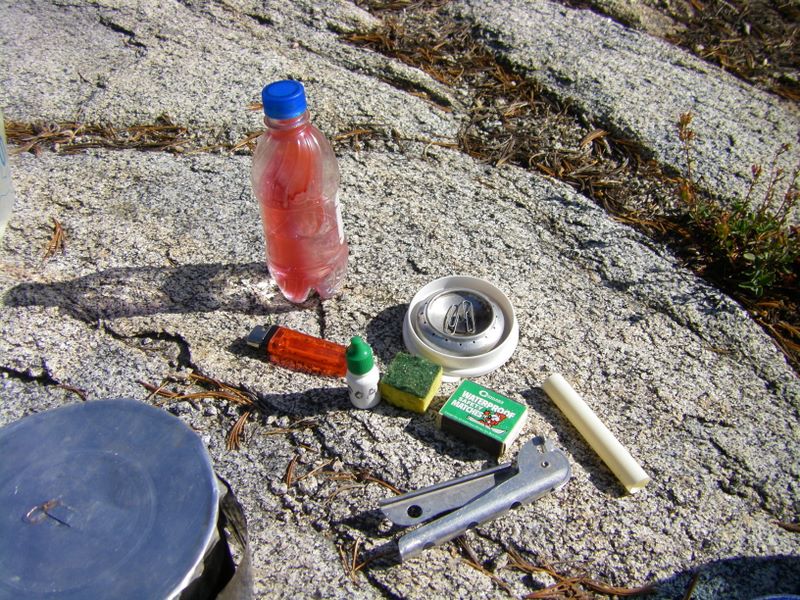
Use the cap of the fuel bottle to measure out the fuel - most stoves use six to eight capfulls - roughly one liquid ounce. After a while you get a feel for how much you need and you can just pour it.
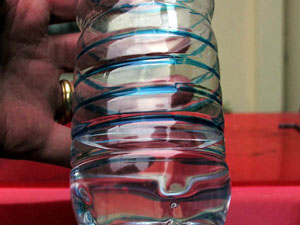
You can mark a water bottle with blue magic marker in the grooves - this is a bit more than an ounce. ( 1 pint = 16 oz. ) The bottle pictured holds 25 oz.
The shampoo bottle you get at hotels while traveling are often one ounce - use one to see how much fuel that is. I've also read that a clear 35mm film canister holds one ounce of fuel.
Update: I ALWAYS use red paint to mark my fuel containers now - it is too easy to mistake the alcohol fuel for water otherwise. Also note that the alcohol fuel is very volatile - NEVER add fuel to a burning stove!
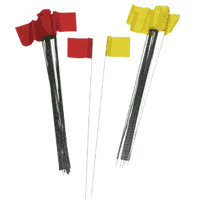 |
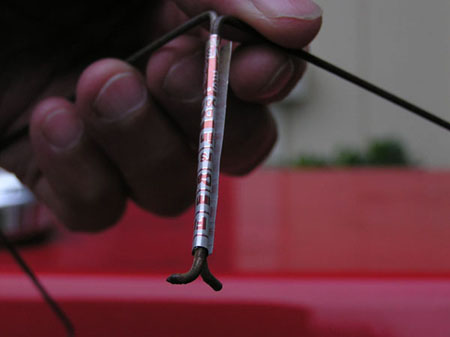
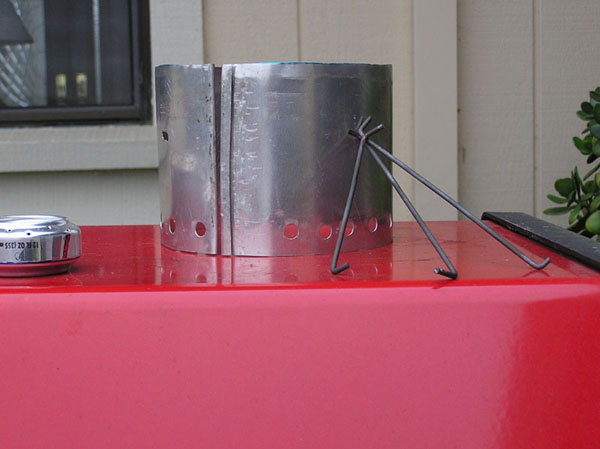
The pot stand can be made from the flags on wires used to mark irrigation points, pipelines, etc. Use Google to search for "marker flags". These are probably made of steel - some other wires will not stand up to the heat well enough. Update: The local hobby shop had titanium wire! Much superior to use. Also, the open leg/folderable design is not as sturdy as one where you bind all three legs. If you can do that and fit it in your cooking pot, it will be better. I still use mine as a foldable style and have only had one pot tip over accident. For a three piece, triangular stand, first make a template with the dimensions below. Note that two of the pieces need a small angle at the bottom to keep the connector in place. The other piece needs an angle on both legs. Once put together, this stand should be able to fold flat and fit inside your pot. Note that the ends are relatively sharp/pointed, so you don't want it to poke holes into things...like your pack, sleeping pad, etc.. |
 |
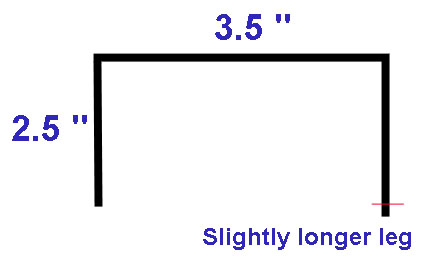
The height of the stand might vary depending upon the ideal distance between the top of your stove and the pot. This distance can significant affect the time it takes to heat up your water. Each stand should be configured for the stove it will be used for as the height between the stove and the pot is very important. The stand shown has the dimensions 3.5 inches wide by by 2.5 inches high. Note that one side has some extra length to allow for a bend to keep the wrapped soda can sleeves attached. |
 | Using pliers, bend the wire with 90 degree angles to the dimensions. Cut off the remainder of the marker flag from the last leg. Being careful to make all the heights the same, bend the small dogleg pieces. Cut off any excess. Cut two lengths of soda can, about 2.25 inches high and one inch long (the height of the legs), and wrap it around two of the legs on two of the pieces. The piece with the two doglegs is the middle piece. The other two pieces have a dogleg where the soda can wrap is, and just a straight leg on the free end. |

Update: The wire stands cannot absorb much heat by themselves. When you take the pot of water off the stand, if the alcohol stove is still running, you should take the stand away too. Otherwise it will get red hot and get weakened.
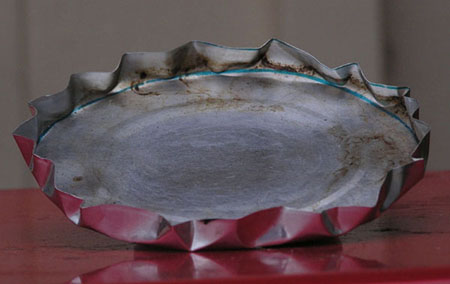 |
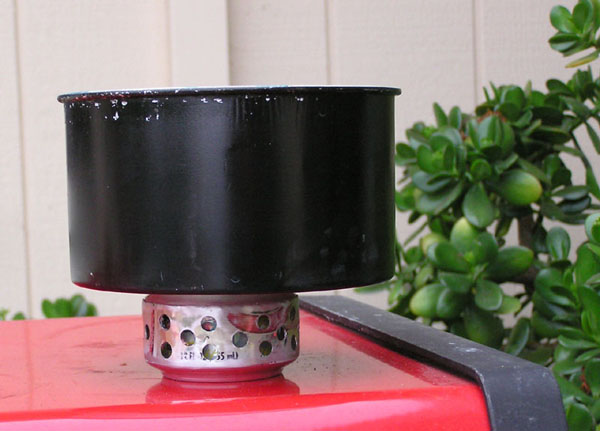
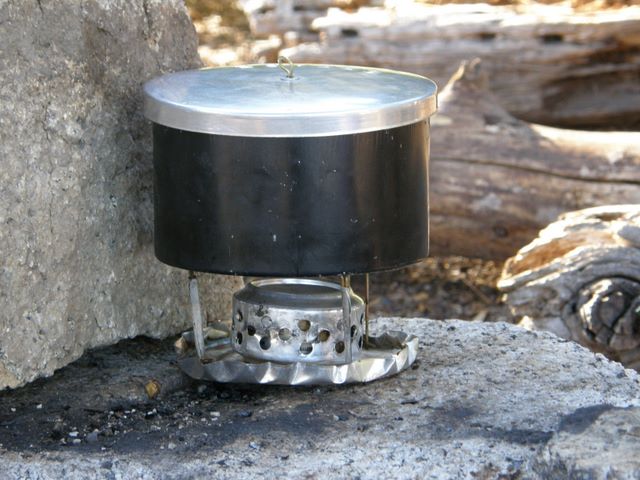
I think it helps to have a base - not only for the safety (or planned use) in regards to alcohol on the outside of the stove but also for stability of the system. In addition, it probably reflects heat to the pot better. This is made of of a pie tin cut to fit inside the grease pot, and then with the sides crimped up. I used the grease pot to make the outer circle where I cut the pie tin with sissors. Then I bent it up, and it could fit inside my pot. |
 TADA!!!!
The windscreen is very, very important. It should fit around the pot with 1/4 to 1/2 inch clearance. IMPORTANT: The amount of clearance makes a big difference in the stove and the heating. Too little and you will "starve" the stove (or melt your windscreen). Too much and the sides of the pot won't be heated.
Also make sure you don't make your windscreen too high.
You'll probably need to make several windscreens for the different kinds of stoves.
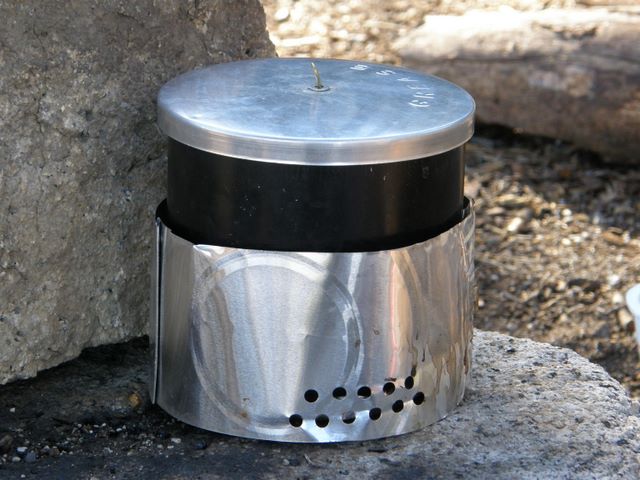
The particular windscreen shown here is made of relatively thick sheet metal from Home Depot - it came as an ~8 inch by 2 ft strip. The heavier sheet metal has some stability which helps but there is the weight consideration. It has 3 metal bars that poke thru slots in the side to form a stand for the pot.

An alternative, which is useful for the stoves using a separate stand, is 2 pie tins (12 inch pumpkin pies from Costco), height 3.25 inches & 18.5 inches long. This windscreen can be melted by the stoves if the flames touch it.
Cut the whole pie tin, hammer down angled part (it will spread out some), then make a folded over 1/4 inch section to put the two pieces together. Use the hole punch to put a series of holes in the bottom.
This windscreen is somewhat flimsy, so you have to be careful with it.
Update: The windscreen above is way too heavy. So, first, I cut two aluminum pie tins, joined them together, used a paper hole punch to make a row of holes in the bottom. That worked out really well until I got in some windy conditions and the heat from the alcohol stove melted some of the aluminum.
So now I use a titanium foil windscreen - it's very light, compact, and seems to stand up well to my cooking with alcohol stoves. I got one here - FireLite Titanium Foil Windscreen.
 |
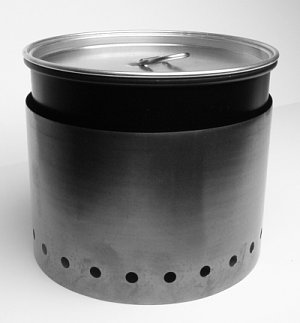
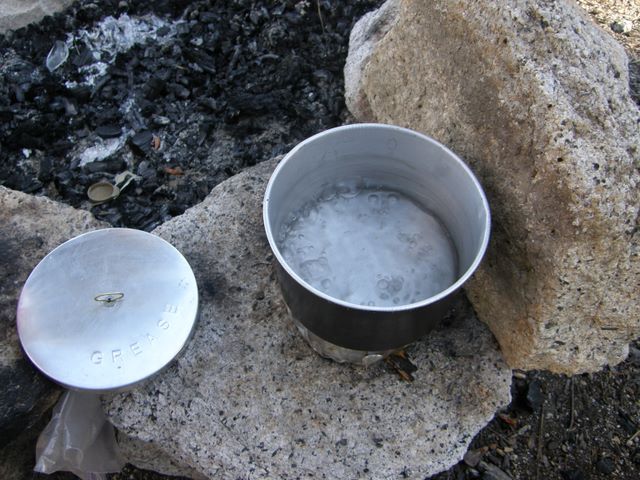
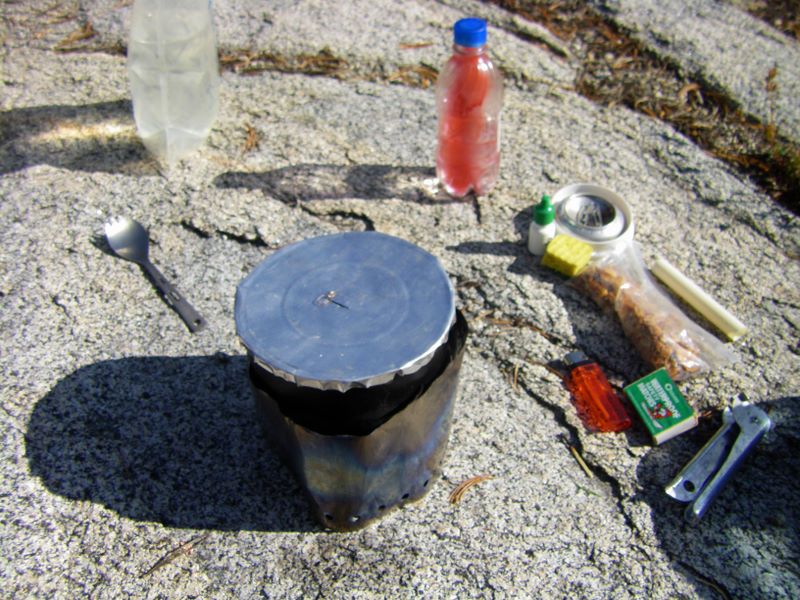
This is a Kmart Greasepot, costing about $6.50. It can boil 4 cups of water, weighs 2.65 oz with the aluminum pie tin cover I made for it (The lid it comes with was a lot heavier). It's a good size, bigger than it actually needs to be, but it also serves as the container for all my kitchen gear. I've found that to be important so all the little bits and parts don't get lost or crushed in my pack. I personally like to use a pot holder too, though one of my buddies just uses gloves. Update: I've read that the Kmart Greasepot is no longer available. |
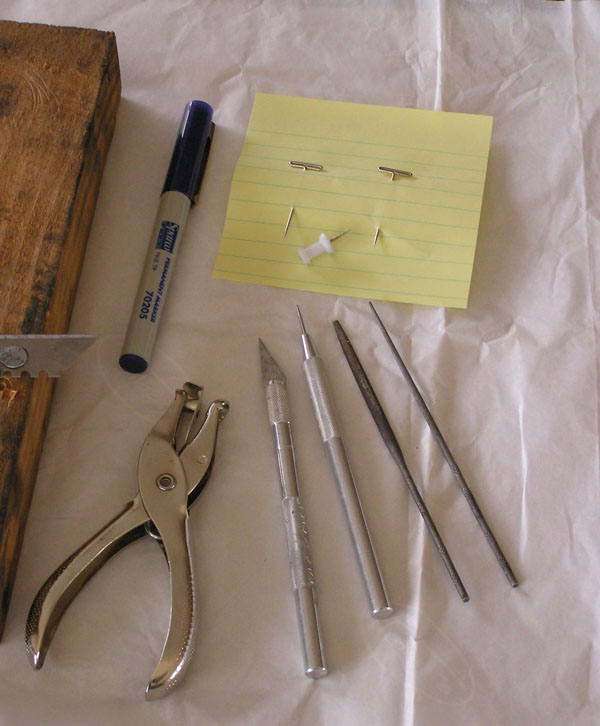 |
Here are the tools I used - they are all pretty simple. In the field I think you could use a LeatherMan Tool to make these stoves. To the far left is my block of wood with a razor blade nailed to it - this was a very handy tool used to score the cans on a straight edge for cutting. You can see the marker and a set of pins for making holes. I usually punched the holes in the top of the stove after cutting the top piece, but I found it was sometimes easier or better to do it before. It somewhat depends upon the design of the stove. The hole punch and small files were very important for creating the holes for loading the fuel, reaming out holes, etc. I'd start the hole with the hole punch or a 1/16th inch drill, then finish the hole with the files. The Xacto knife I kept very sharp and used it for cutting the metal. Note that if you could score the metal it helped a lot, and you didn't always need to cut the metal. If you scored it and could bend it back and forth, it usually fatiqued quickly and broke right along your scoring. The single hole punch was great for cutting holes in the stove parts, windscreens, etc. One item not pictured is fine sandpaper - I did often use that to sand the edges of the cans. I think even a very slight angle can sometimes help the cans go together. Likewise, I used a large rounded file for cutting out and smoothing the large holes on some of the stoves. |
I used my small files to file the end of the pushpin down so the hole it made was smaller. I tried using some pins (not needles), but these bent too easily. When I did, I found that tapping them on the end with a light hammer worked well...but was awkward. For the bigger holes, I used a 1/16th inch drill. |
 |
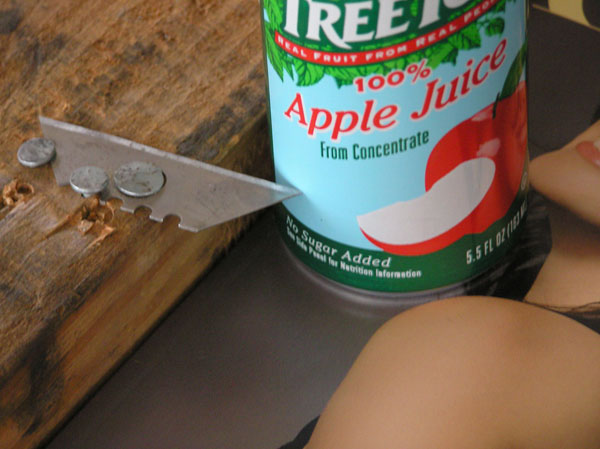 |
To cut the cans, I used a board with razor nailed to it. I could adjust the height by using magazines for height adjustment. I'd rotate the cans in place, usually applying light pressure on the side, to score the cans. I did not use this to actually cut the cans, just to score it. Using this technique I was able to get very straight cuts - this helps a lot when trying to put the cans together. After the can was well scored, I'd put it down sideways on paper and start a cut with the Xacto blade. Then I'd push the can in behind the blade - I didn't actually use the blade much to do the cutting. The scored metal would come apart along the scoring. |
NOTE: In the daytime the flames from alcohol stoves are usually NOT visible!!!!
These stoves can put out a lot of heat!!!!
Be very careful to make sure the stove is out - especially if you are going to add fuel. Use caution when testing to see if the stove is out - often, it is still lit on the inside. Don't go burning your fingers!
Many of these stoves cannot be blown out...just let them burn out or use a can to cover them. Do not use your pot - it's bad for your health.
DO NOT EVER THINK ABOUT ADDING ALCOHOL TO A BURNING STOVE!!! NEVER, EVER!!! The alcohol is very volatile, it will probably flash into flame even before it gets to the stove if there is an open flame. Which basically means that YOU will be on fire too!
Here are some pictures taken out in the field on backpacking trips.
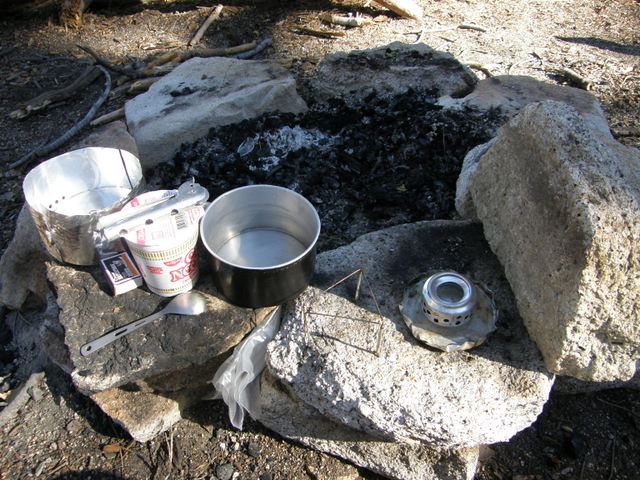
| Angel Island, April 2007 I'm NOT the one who burned the table top! See the double oatmeal packets? An alcohol stove is ideal for breakfasts like that (along with the big cup of hot chocolate!). |
 |
|
| Cottonwood Lakes, August 2007 Note that I got smart about painting my fuel bottle red! |
 |
|
| Yosemite, North Dome, August 2007 | 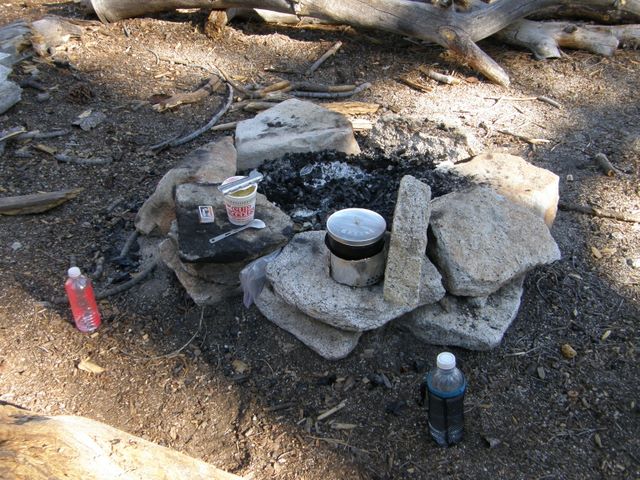
 |
|
| I'm using a pot holder now. I haven't changed out the gease pot lid yet. The Cup of Noodles is another great quick meal, though kinda bulky....but I had lots of room in my GoLite Jam pack. |

 |
|

 |
||
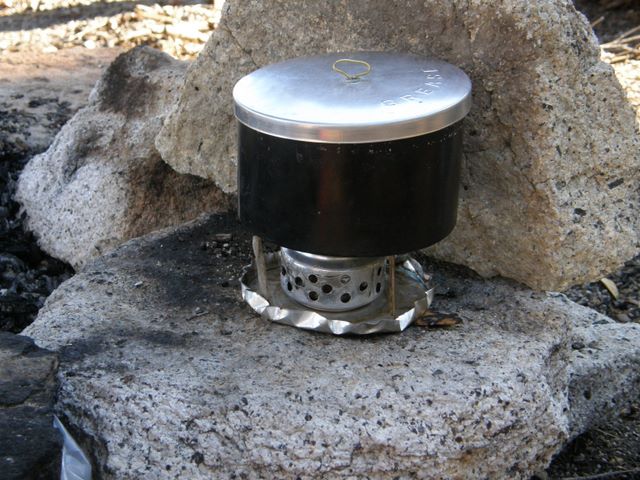
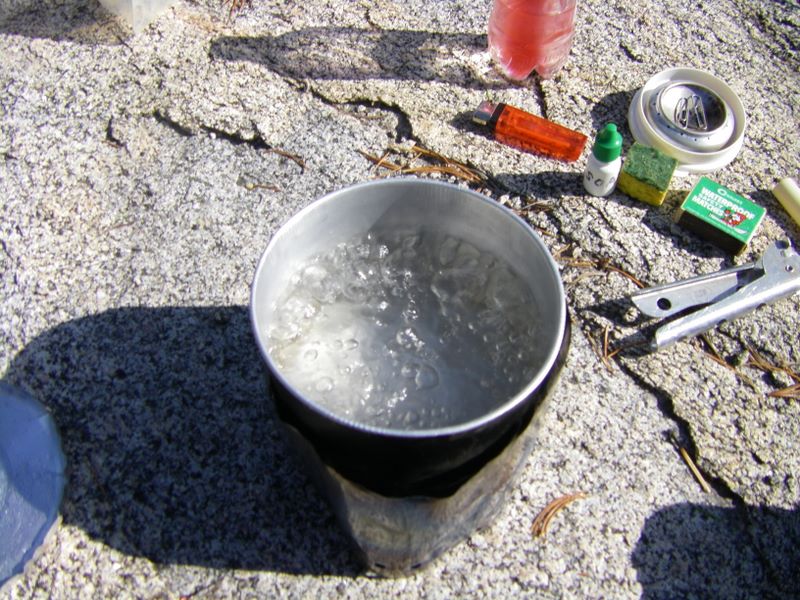
Note the nice boiling water! You can also see the pie tin origin of the windscreen. |
 |
|
 |
||
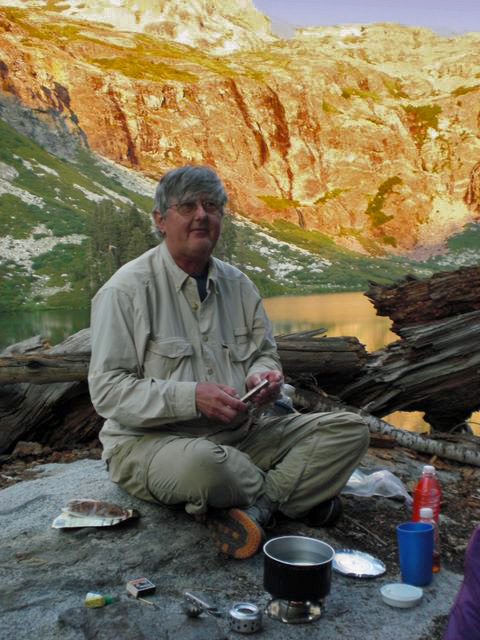 |
At Hamilton Lake in Sequoia National Park at sunset, water in the pot, windscreen in my hand, ready to cook my mashed potatoes with their bacon topping by my side. There's enough water for my hot chocolate too... yummy! | |
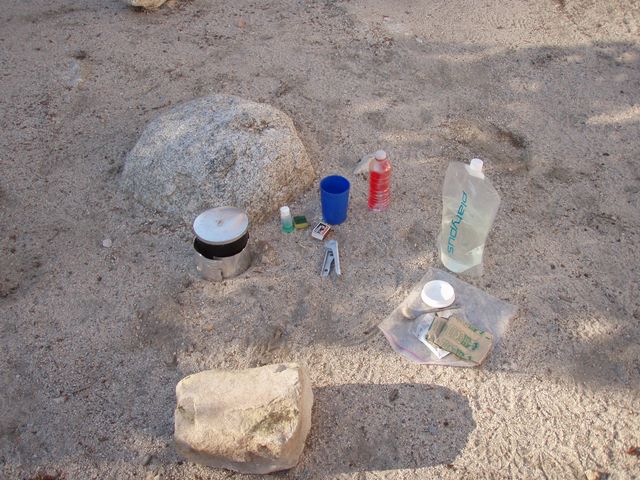
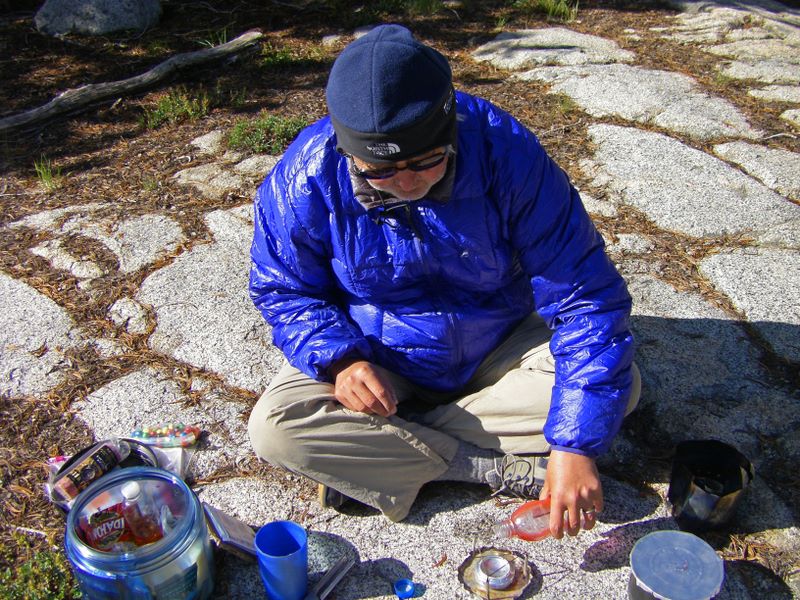
| At Blue Lake in the Sabrina Basin area - all my kitchen gear is laid out. It's amazing that almost all of this gear was made in 2007, and is still being used and working well in 2014. |  |
|
| |
|
|
 |
And a tiny bit higher at Topsy Turvey Lake. It got quite windy and cold
when we were there, though not quite freezing. My little alcohol stoves performed
fine, though the wind screen was necessary. In the first picture I'm pouring the alcohol into the stove. I usually don't measure it anymore as I've got it pretty well figured out how much I'm putting in. In the second picture, the stove is heating the water in the pot. I'm using my FireLite Titanium Foil Windscreen - I really like it!. |
|
 |
Note that the stove is set on a non-burning surface for fire safety. In the
third picture I have all my kitchen implements/tools all laid out for
my use, in handy arms-length range. AAAaaaahhhh, lovely boiling water... I'm going to be eating and drinking in a few minutes! |
|
| |
|
|
| This is way back in the Upper Kern basin in 2010. It was gorgeous there! The night before we camped at Tyndall Creek where there was a bear box. I have my kitchen laid out on top of it. All the equipment is still working! It looks like breakfast is two packets of oatmeal. | 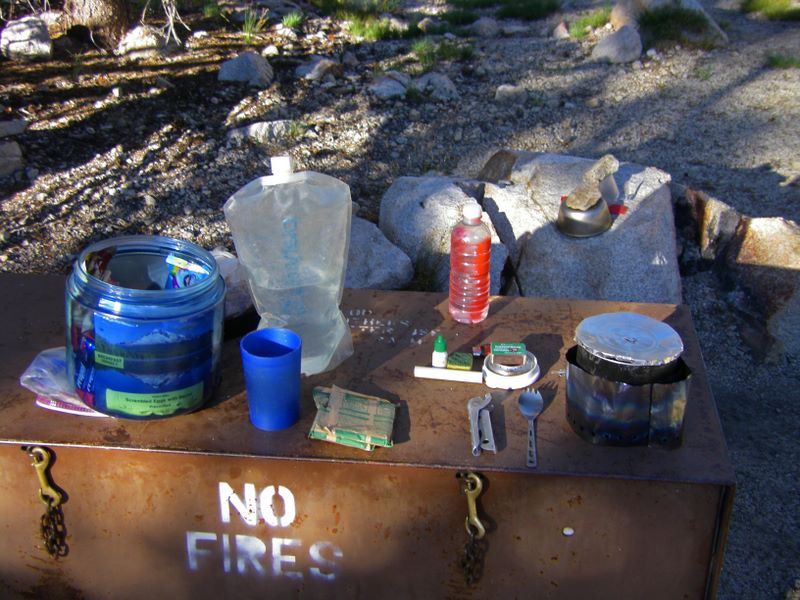
| 
|
Information and resources pertaining to lightweight backpacking. The links have how-to info, trip planning, gear reviews, discussion forums, trail journals, and related topics. Many of the sites have additional links to other beneficial websites as well.
Links to ultralight and lightweight equipment manufacturers who cater specifically to lightweight and ultralight enthusiasts. Check out our/their websites and carefully compare what they offer, to find out what will work best for you.
If you have any questions, comments, whatever, please feel free to contact me at
![]() .
.
Sorry, this is not a link due to way too much spam....
